|
RTI goes Two-Way
Two-way communication is here!

The launch of RTI’s two-way communication
platform coincides with the introduction of several new additions to the RTI
family of control solutions. In addition to the release of Integration
Designer 7.0, new two-way compatible 2.4GHz ZigBee® versions of the T2-C, T3-V,
and T4 wireless system controllers and the ZM-24 2.4GHz ZigBee® Transceiver
Module are available.
Firmware updates for existing XP-8 Control
Processors and RK3/K4 In-wall Controllers raise the capabilities of existing RTI
gear.
Watch the Introduction and Programming Video:
Overview:
RTI’s two-way communication platform
The launch of RTI’s two-way communication platform coincides with the
introduction of several new additions
to the RTI family of control
solutions:
- In the handheld category, new two-way compatible 2.4GHz ZigBee® versions
of the
T2-C, T3-V, and T4 wireless system controllers are
available.
- Additionally, the ZM-24, a new 2.4GHz ZigBee® transceiver
is available,
connecting to two-way compatible RTI processors and allowing
two-way communications with compatible wireless products.
- The ZB-Pro Professional Network Configuration Tool will
also be made available for dealer purchase.
This allows the integrator to
wirelessly configure ZM-24 repeater modules.
- Firmware updates will be made available to several
existing products, allowing them to become two-way compatible.
These
products include the XP-8 system controller, the RK3
and K4 in-wall touchpanels,
and the
T2-C, T3-V and T4 wireless
system controllers.
- A second phase of the two-way launch will consist of two additional
two-way compatible processors,
the ZRP-6 and the
MRP-64 multi-room control processor.
- Firmware updates to the RKM-1, RK1, and RK2 in-wall
products will also be made available
during the second phase of the
two-way launch.
The Technology
The XP-8 advanced central control processor, utilizing firmware 2.0 or
higher, now has the ability to communicate via two-way RS-232 or IP over
Ethernet with third party equipment. Combined with the infrared and relay
control capabilities already available, the XP-8 can now control and receive
feedback from many devices.
The introduction of ZigBee® technology to the
T2-C, T3-V and T4 allows this meta-data to be transferred wirelessly from the
XP-8 to a 2.4 GHz handheld remote, utilizing one or more ZM-24 transceivers.
Additionally the RK3 and K4 can communicate with and receive feedback from
the XP-8 via the Ethernet connection.
Future firmware updates will allow
communication using the Control port of all RTI in-wall products.
Software Programming
Keeping with RTI’s goal of a single, user-friendly programming interface,
RTI is launching Integration Designer 7.0, the latest version of its acclaimed
programming software.
Integration Designer 7.0 will continue to be able to
program all existing one-way RTI products will continue to use Integration
Designer, in addition to allowing programmers to easily take advantage of the
new two-way communication platform.
Through it’s Integration Partnership program, RTI has teamed
with many industry leading companies to ensure seamless two-way communications
control.
Two-way drivers have been added for simple, drag-and-drop
programming of two-way control.
While the driver database is continually
being added to, the initial software release includes support for popular
products such as the Escient Fireball and Vision, Aprilaire thermostats, Lutron
Homeworks and RadioRA, as well as Denon, Yamaha, Marantz, and Integra
receivers.
What you will need to get started
Software - All of the following
- Integration Designer 7.0 or higher
- Firmware updates for two-way
enabled RTI equipment
- Drivers for two-way compatible devices (receiver,
lighting, music server etc)
Hardware - One from each category
Two-way enabled control processor
- XP-8
-
ZRP-6 (Release Date: 3rd Quarter 2009)
- MRP-64
(Release Date: 3rd Quarter 2009)
NOTE: The ZRP-5 control processor will be
able to communicate with Zigbee® enabled remote controls via a ZM-24 Transceiver
Module, however it will not allow two-way feedback.
Wireless two-way control
Handheld Remote Control
New Zigbee® enabled wireless
remote controls (T2-C, T3-V, T4)
NOTE: Existing 433MHz RF
versions of remote controls are not capable of utilizing two-way communication,
and there is no way to upgrade existing remote controls.
and
Transceiver Module - Antenna
- ZM-24
2.4GHz Transceiver Module (utilizing Zigbee® wireless technology)
-
ZB-Pro Professional 2.4 GHz Network Management Tool (Optional)
This
tool is used to program ZM-24 modules when more than one is used in an
installation. If only one ZM-24 is used, the ZB-Pro is not necessary.
In-wall two-way control
In-wall controller
- RK3 or K4 in-wall
controller with the latest firmware loaded.
NOTE: Existing RKM-1, RK-1 and
RK-2 controllers are not capable of utilizing two-way control, however they can
be used with any processor for one-way control. A future firmware updates for
these products will enable two-way feedback.
Basic two-way installation steps
1) Download and install Integration Designer 7.0 or higher IMPORTANT
INSTALLATION
NOTE: The default location for .rti system files and
IR/RS232 library files (.cml/.rs232lib) has been moved to the My
Documents\Integration Designer\ folder (or Documents\Integration Designer folder
if you are using Windows Vista®). The installation will not delete or move
existing files created by Integration Designer (or its predecessor TheaterTouch
Designer).
2) Download two-way drivers for devices being controlled
Two-way drivers are not included with Integration Designer and are a
separate download from the Drivers page of the the RTI web site. - Drivers are
"installed" by opening the control processor in Integration Designer, going to
the Drivers tab and clicking the "Add Driver" button. NOTE: The recommended
location for these drivers is My Documents\Integration Designer\Control Drivers.
PROGRAMMING NOTE: If more than one identical device is going to be controlled
(ex. two of the same model of receiver), another instance of the driver must be
"installed" in the control processor.
3) Update firmware on RTI equipment
Two-way enabled RTI
equipment must have the latest firmware version installed. For all
currently-available devices this is version 2.0 or higher.
4) Verify the properties of the RTI equipment is set
correctly
- Add the RTI control devices to the system file.
- Enable firmware version 2.0 support:
There is a checkbox located in
the General tab of each device properties that must be checked to enable
two-way control and other features added in firmware version 2.0.
- Output properties: The Default Output section on the Output tab of each
device's properties must be set to "Two-Way Trigger Codes", and the Two-Way
Transport section must be set as follows:
- Wireless Zigbee® Remote
Controls- Set to "Zigbee"
- In-wall controllers - Set to "Ethernet"
NOTE: The first release of two-way control with in-wall controllers (RK3/K4)
will only utilize two-way control via the Ethernet. A second phase of two-way
control will enable RS-485 as a communication method, however, RS-485 is slower
and is not recommended for feedback that requires high data speeds (album art,
song lists etc). - Network Key: Each system file will get a randomly generated
Network Key. This key does not need to be changed unless networking issues arise
and changing the key may be regenerated as a troubleshooting tool.
5) Define driver properties
Each two-way driver has a
set of properties that must be defined.
Click on the control processor in
the system file and click on the Drivers tab.
Select the appropriate driver
in the list of installed drivers and select the settings that will be used.
NOTE: Click the "Get Info" button for each driver to see more information on
how to configure that driver.
6) Program ZM-24 Transceiver Module (only if ZM-24s are used as
wireless repeaters)
The ZM-24 that is hard-wired to the Zigbee®
enabled control processor does not need to be programmed.
Additional ZM-24
modules do not need to be wired back to the control processor, however, they do
need to be programmed as a "repeater" using the ZB-Pro. Plug in the ZB-Pro to a
USB port on your PC. Go to the Communications menu in Integration Designer and
follow the ZM-24 programming wizard.
NOTE: The ZM-24 must be within 10feet
(3M) of the ZB-Pro for this programming.
Programming overview
The two-way programming process uses the same basic methods of drag and drop
that is used for IR and RS-232 control (when programmed using the RS-232 library
browser). In addition, the graphical layout of displays on controllers can be
customized to meet the needs of the programmer and the installation. In order to
keep programming as intuitive as possible, the methods used to program two-way
control is the same no matter which model of controller that is used and even
which communication type that will be utilized (Ethernet, Zigbee® or RS485).
- Perform all of the steps listed above in the "Basic two-way
installation steps" section.
- Layout the controller pages and display graphics.
Using the page wizards or page layouts you've created, layout the pages on
the remote for the devices being controlled.
- Draw buttons for text based feedback.
Use the Draw
Button tool to create buttons that will include text based feedback (ex.
current temperature, current station etc) - Go into the button properties to
set the font and font size.
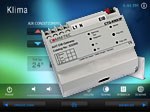
- Add dynamic images for visual feedback.
Go to the
Graphics tab of the library browser to find appropriate graphic that will
display the current state of a device. (ex. slider bar for current volume,
power on/off etc).
- Choose a driver to use.
This is similar to selecting
a new remote from a IR library.
Go to the Drivers tab of the Library
Browser and click on Select Driver, then select the driver that will be used
from the list of installed drivers. NOTE: All two-way communication drivers
are developed by RTI, it is not possible to write custom drivers.
- Program the buttons with Driver Commands.
Once a
driver has been chosen, the library browser will display a list of driver
commands and variables that are possible. Driver commands are the actual
commands used for control of the device (power, volume etc) - Drag the driver
commands on to the appropriate buttons.
- Assign variables to buttons.
Variables change the
visual state or text on a button reflecting feedback from the device that is
being controlled. The list of possible variable options is the same for every
driver. Variables can be assigned to buttons that also have a driver command
assigned to it.. - For text based buttons - Either drag a variable on to the
button from the library browser or select the variable from within the Text
tab of the button properties. - For dynamic graphic buttons - Drag a variable
from the library browser.
NOTE: Dynamic graphics must have a variable assigned to them to show
feedback.
Some button programming examples:
Preset channel
It is possible to have a text based
button that displays the current preset channel when power is on, and is blank
when the power is off
AM/FM band button
Program the driver command to change
the AM/FM band in macro, while the button text variable shows which band is
currently selected.
Other Programming
Driver Events
Within the XP-8 programming an event can
be triggered based the state of a device being controlled changing.
(ex.
Lutron light switch is turned on > an event can trigger a system macro to
also turn on some music)
Page links on other devices
From within a macro, a page
link can be performed on another two-way enabled device.
• In the macro
editor, select the page link function
• Select the device from the list of
compatible controllers and the page link.
|